#369439 - 30/09/2017 01:40
 Final custom 3D fascia models
|
carpal tunnel

Registered: 20/12/1999
Posts: 31636
Loc: Seattle, WA
|
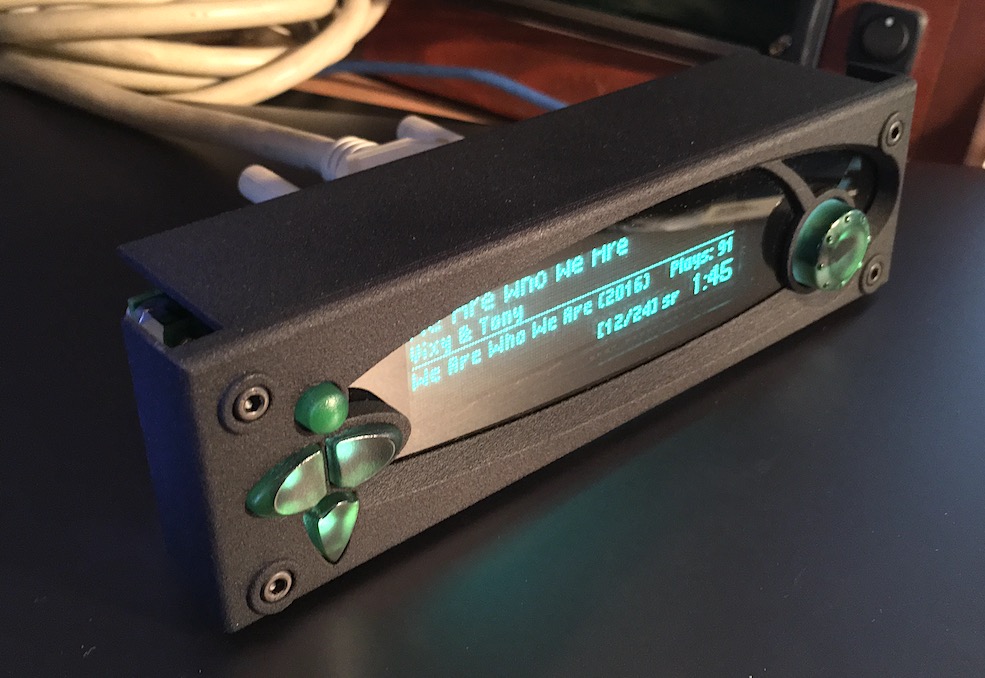
Attached are the final 3D models for my custom fascia for Rio Car and empeg Car mk2/2a.  Notes: - These are intended to be printed at Shapeways with the "strong and flexible black plastic" printing option.
- These are specifically for the purpose of custom mounting of the empeg display, using the Eutronix Display Extender, without a pull handle.
- However, you are free to modify these for your own uses, upload them to Shapeways yourself, and print the new versions.
- These are deliberately designed to be narrower than the original fascia, i.e., without the "ears" prodtruding above the handle.
- Because the "ears" are gone on these fascias, any lens that you use will also need to have its ears carefully trimmed off in order to work as expected. Be careful not to crack your lens when trimming it: I recommend either a dremel tool cutting disc at low speed, or careful repeated scoring with an X-acto blade until it separates easily.
- I have provided two versions, one with a rounded edge and one with a flat/squared edge. The flat one is meant so that you can take the source file and then modify it to easily add your own custom mounting points around the edges, and/or to change the shape and size of the outer edge to meet your needs and desires for your particular custom installation.
- If you edit these yourself, open the attached ".blend" files in the 3D editing program Blender.
- If you edit these yourself and then print them at Shapeways, make sure to re-export the files as "STL" files for uploading to Shapeways.
- When uploading the STL files to Shapeways, I have noticed that their importer gives me guff about the size of the model, displaying an error message box. It does print them at the correct size though. Before printing, double check that the message says the correct expected size. In my case, the message said "we scaled your model using the meter scale, now your model at 6.68 x 2.265 x 0.236 inches, or 16.968 x 5.754 x 0.6 cm can be printed", which is the correct dimensions for my version of the models.
- The size and fit of the holes for the left/right buttons are very tricky. If the button holes are too big, the buttons fall out, and if they are too small, the buttons "stick" and you can't press them. I have sized these holes to perfectly match and fit my translucent custom colored button set, but your button set may be different. In particular, I have found that the original factory gray buttons are a hair larger than the translucent custom colored buttons, and might stick a bit. If that happens, trim the button holes to be a tiny bit larger using a very sharp x-acto blade. Locate the parts that need to be trimmed by sticking a button into the hole tightly, removing it, then looking very closely to see where it rubbed against the textured plastic (with the Shapeways plastic, you can tell if you look real close). Be careful not to trim too big or else the buttons will fall out.
- Remember, when reassembling, do not cinch down the fascia allen screws or the display board standoff bolts too tightly. They can strip very easily.
Blender file with curved edges: Custom Empeg Fascia - Curved Edge.blendBlender file with flat edges: Custom Empeg Fascia - Flat Edge.blendEnjoy!
|
|
Top
|
|
|
|
#369440 - 30/09/2017 09:14
 Re: Final custom 3D fascia models
[Re: tfabris]
Re: Final custom 3D fascia models
[Re: tfabris]
|
pooh-bah

Registered: 02/06/2000
Posts: 1996
Loc: Gothenburg, Sweden
|
NICE!
Really like the look of the finish, is that the default from the printer or has it been treated/applied/processed in some way?
_________________________
/Michael
|
|
Top
|
|
|
|
|
#369441 - 30/09/2017 10:08
Re: Final custom 3D fascia models
[Re: mtempsch]
|
carpal tunnel
Registered: 20/12/1999
Posts: 31636
Loc: Seattle, WA
|
Thanks! That's the standard way that the Shapeways "black strong and flexible" plastic looks. 
|
|
Top
|
|
|
|
|
#369442 - 30/09/2017 11:59
Re: Final custom 3D fascia models
[Re: tfabris]
|
carpal tunnel

Registered: 29/08/2000
Posts: 14548
Loc: Canada
|
Great, thanks!
So.. when uploading to Shapways, it asks this:
Model Units: millimeters inches meters
Which should we select? EDIT: meters
Also, it rejects .blend as a filetype.
So, I loaded it into Blender to convert .. failed.
EDIT: Apparently it REQUIRES Blender version 2.79.
Working better now, thanks. No complaints from Blender, and no complaints about scaling from Shapeways when uploaded as "meters".
Edited by mlord (30/09/2017 12:22)
|
|
Top
|
|
|
|
|
#369443 - 30/09/2017 12:23
Re: Final custom 3D fascia models
[Re: tfabris]
|
carpal tunnel
Registered: 29/08/2000
Posts: 14548
Loc: Canada
|
The "rounded edge" still looks flat -- I guess the rounding is a very tiny radius?
Thanks Tony!
|
|
Top
|
|
|
|
|
#369445 - 30/09/2017 14:09
Re: Final custom 3D fascia models
[Re: tfabris]
|
carpal tunnel
Registered: 29/08/2000
Posts: 14548
Loc: Canada
|
Yeah. But at least Blender showed "meters" on the display, so I then knew what to tell Shapeways! Looks like I'm getting the only remaining blue Subaru Crosstrek Sport ("mid trim" model) from Eastern Canada -- they're sending a truck to a dealership 12 hours North of here to collect it for me. There is a lot of space in the dash under the factory HU and climate controls in that model, so it may be able to mount the empeg sled "properly" with some effort. We'll see. I'm holding off the 3D print job until installation time -- perhaps a custom mod to your fascia might do the job, or integrated into a larger dash-replacement fascia or something. TBD. Oh, for the curious: Shapeways was quoting me CAD$30 (incl. delivery to Canada) for printing one fascia. There's a "free shipping" coupon, but dunno which country(s) it applies to. Thanks again!
Edited by mlord (30/09/2017 14:16)
|
|
Top
|
|
|
|
|
#369446 - 01/10/2017 07:42
Re: Final custom 3D fascia models
[Re: tfabris]
|
carpal tunnel
Registered: 20/12/1999
Posts: 31636
Loc: Seattle, WA
|
perhaps a custom mod to your fascia might do the job, or integrated into a larger dash-replacement fascia or something. TBD. Exactly, that was the intention: Integrate the fascia into your own custom install by modifying the outside edges to match whatever shape you need them to match.
|
|
Top
|
|
|
|
|
#369459 - 03/10/2017 01:58
Re: Final custom 3D fascia models
[Re: tfabris]
|
carpal tunnel
Registered: 29/08/2000
Posts: 14548
Loc: Canada
|
Oh.. and thus far, daily spam from Shapeways after signing up with them, despite their claim not to spam.
|
|
Top
|
|
|
|
|
#369460 - 03/10/2017 07:27
Re: Final custom 3D fascia models
[Re: mlord]
|
carpal tunnel
Registered: 20/12/1999
Posts: 31636
Loc: Seattle, WA
|
To their credit, when I unsubscribed from their unsubscribe screen, I didn't get any more email.
|
|
Top
|
|
|
|
|
#369463 - 03/10/2017 11:36
Re: Final custom 3D fascia models
[Re: tfabris]
|
carpal tunnel
Registered: 29/08/2000
Posts: 14548
Loc: Canada
|
Less spammy than others, but still dishonest that way.
Thanks for setting it all up for us though, much appreciated!
|
|
Top
|
|
|
|
|
#369960 - 07/12/2017 21:05
Re: Final custom 3D fascia models
[Re: tfabris]
|
carpal tunnel
Registered: 20/12/1999
Posts: 31636
Loc: Seattle, WA
|
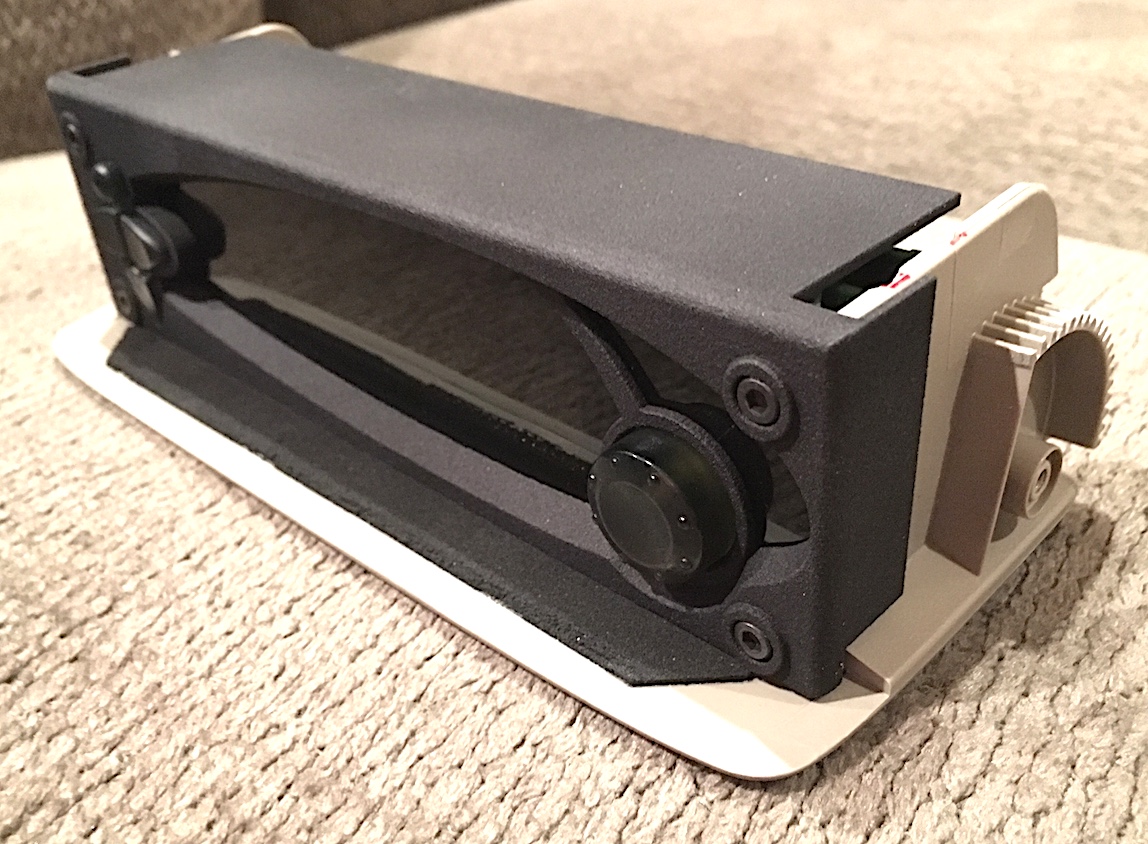
 Here is my final version, which is the "flat" edged one from earlier in this thread which has then had its edges significantly modified to fit the specific custom installation I'm doing in my car. This is an example of how you can take the base versions I posted earlier and then modify them to fit your specific custom install. Later, there will be photos and video of the actual installation location in the car itself. Attached: Blender file - Custom Empeg Fascia - Honda Custom Install.blendEnjoy!
Attachments
Custom Empeg Fascia - Honda Custom Install.blend (470 downloads)
|
|
Top
|
|
|
|
|
#369982 - 08/12/2017 12:16
Re: Final custom 3D fascia models
[Re: tfabris]
|
carpal tunnel
Registered: 29/08/2000
Posts: 14548
Loc: Canada
|
Wow! You have gotta be SOOOOOOOOOOOO pleased!!!
|
|
Top
|
|
|
|
|
#369986 - 08/12/2017 17:51
Re: Final custom 3D fascia models
[Re: mlord]
|
carpal tunnel

Registered: 13/02/2002
Posts: 3212
Loc: Portland, OR
|
Wow! You have gotta be SOOOOOOOOOOOO pleased!!! No kidding... that's crazy good!
|
|
Top
|
|
|
|
|
#369988 - 08/12/2017 21:03
Re: Final custom 3D fascia models
[Re: canuckInOR]
|
carpal tunnel
Registered: 20/12/1999
Posts: 31636
Loc: Seattle, WA
|
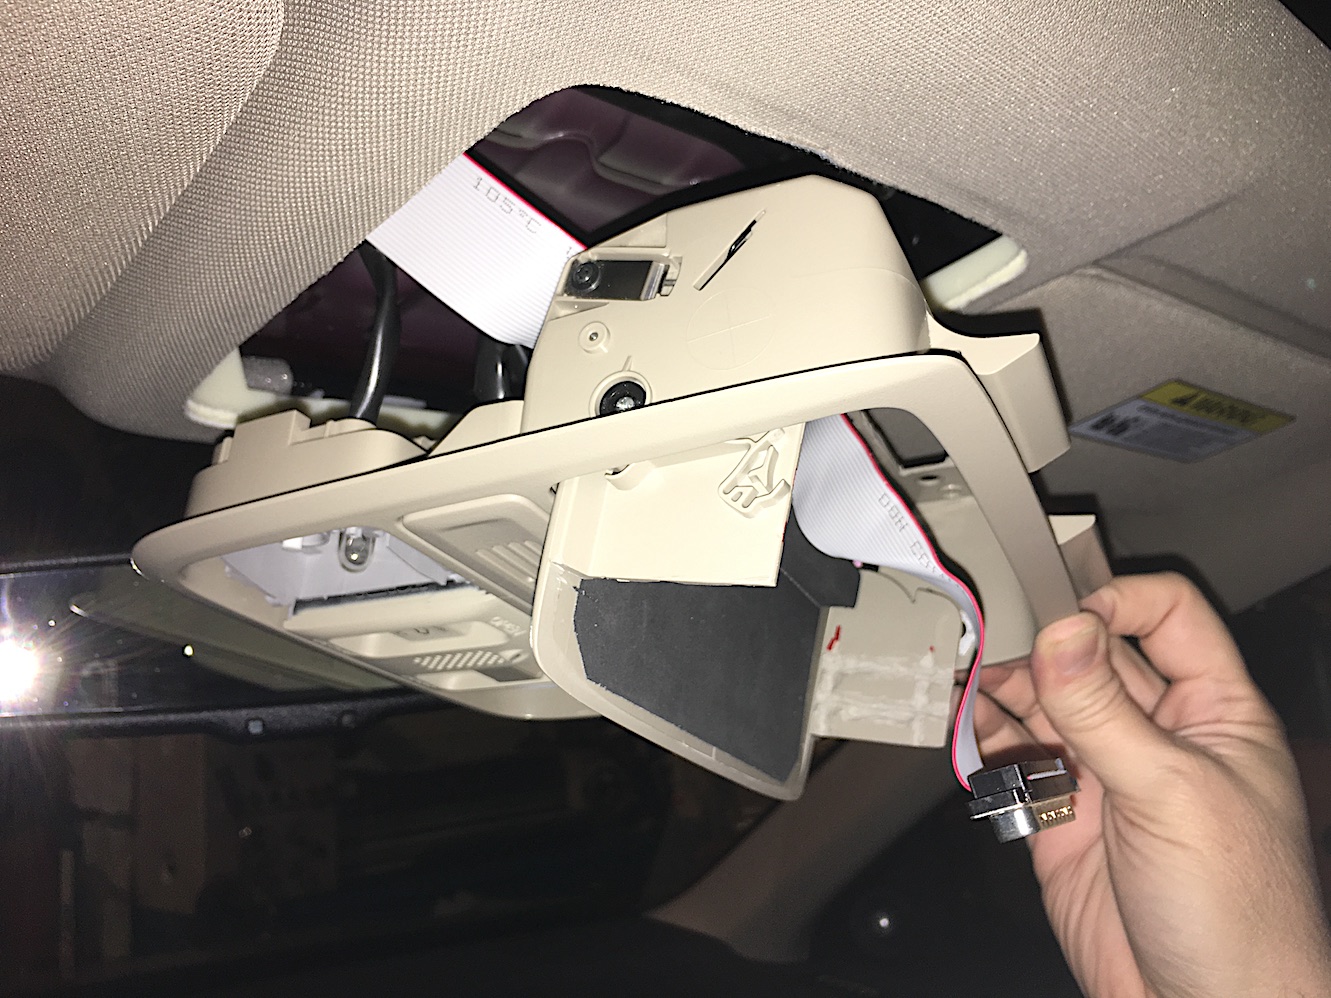
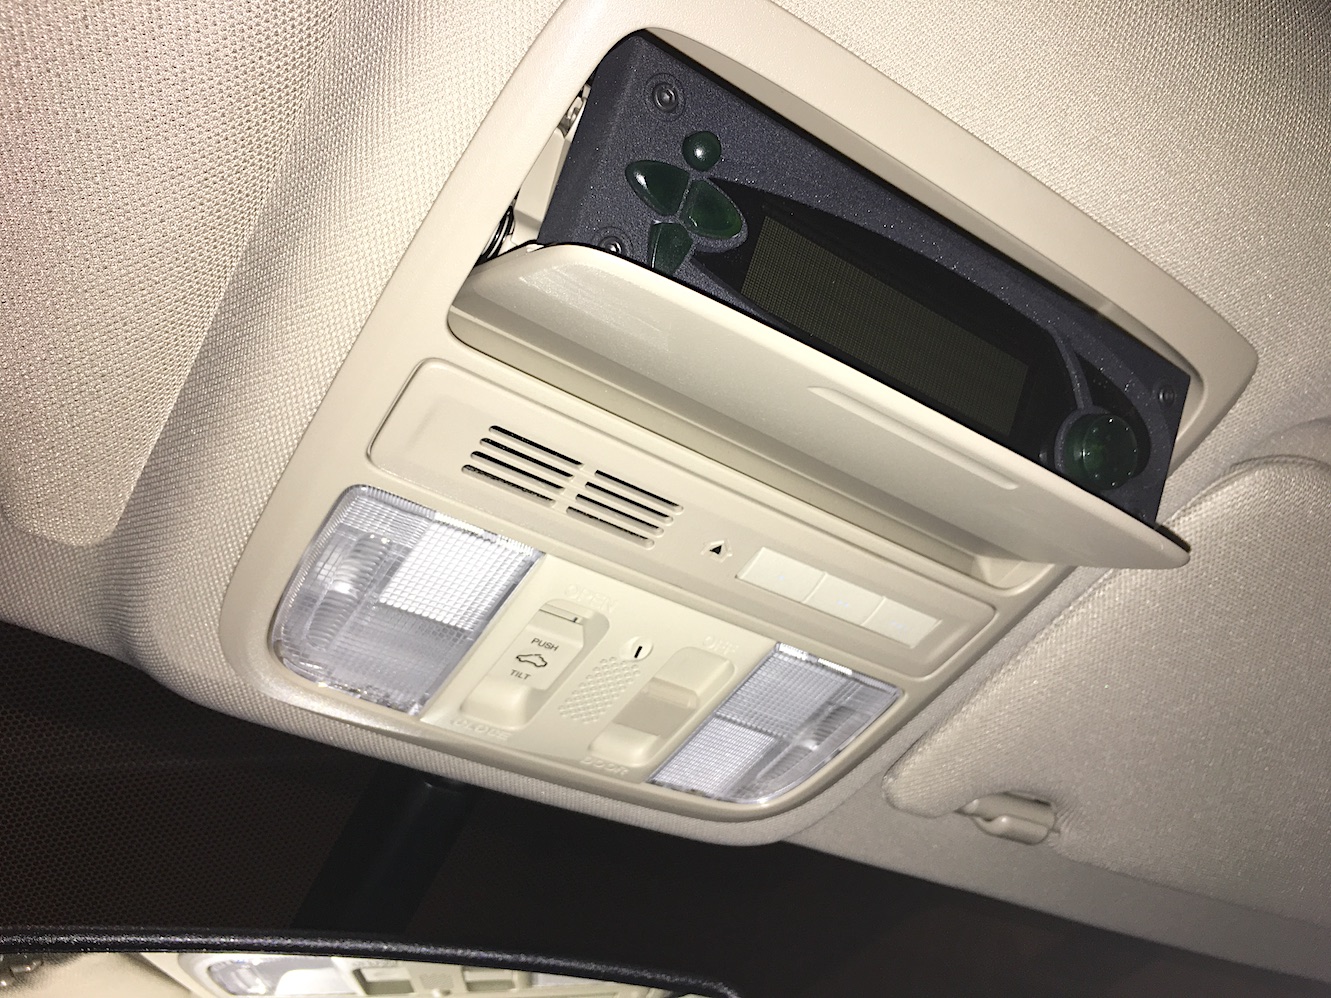
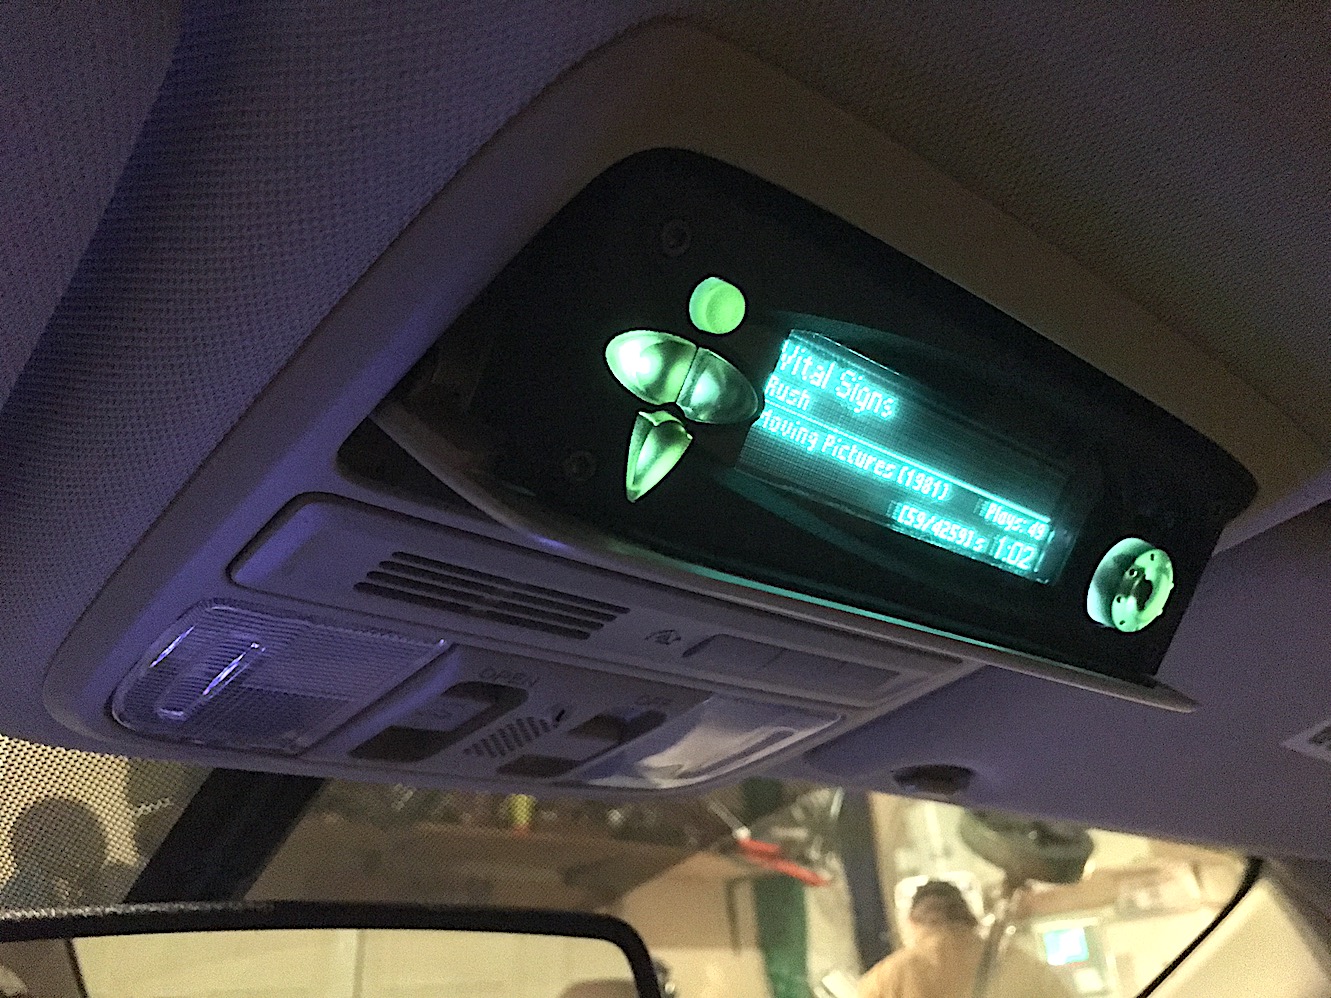
Thanks so much, guys! I am indeed quite happy with it. I have you guys and others on this BBS to thank, since a big part of this installation is the BlueGigaEmpeg project. I also have my roommate Fishy to thank, for his expertise with Blender and also for some expert operation of his expensive tools (more below). And of course, Stu for the display extender, without which none of this would be possible. I am continually patting myself on the back for having bought one of the display extenders when I had a chance, even though I didn't need it at the time. The spot where it's mounted was originally for holding sunglasses. I chose that spot because there was no place high up on the dash to put it, it's all taken up by touch screens. There is a small cubby beneath the touch screen which might have worked, and I was originally thinking of putting it there, but it had a few problems, not the least of which was that it's down too far low and I would have to take my eyes too far off the road to look at it. With the empeg in the sunglass holder spot, I can still see the road with my peripheral vision when I glance up at it. Neither location is truly optimal, but the sunglass holder is less problematic than the cubby. It's one of those interesting mechanisms where you press on it to open it and then push it again to close it. I don't know the technical name for that kind of latching system. When you open it, it swings downward to reveal the sunglasses, with a dampened motion on a small gear system (visible in one of the photos). It's quite intricate. I wanted to have the sunglass holder door still work, i.e., still open and close, so that the empeg fascia could be tucked away and hidden when parked. And I wanted to keep all of that dampened motion and latching mechanism stuff, because it's so fun to operate. Luckily, the display boards tuck perfectly between the left and right sides of the sunglass holder, and a little dremeling made nice little troughs for the boards to snick into. So the whole thing continues to work exactly as it originally did, except now instead of dispensing sunglasses, it dispenses an empeg fascia. I had to make a couple of important changes to the sunglass holder. The first is that the sunglass holder normally swings down 90 degrees, and I had to put a "stopper" tab in place which stops it at about 45 degrees or so. Also I had to design the stopper tab so that I could still swing it the rest of the way downward to the full 90 degrees, because that's the only way to get the thing apart for servicing. My final design allows me to disengage the stopper tab with a screwdriver or a swiss army knife screwdriver blade, swing it the rest of the way down, and get to the screws to get the console piece out of the ceiling for service. The second change I had to make for the sunglass holder was that I had to cut away its whole front section. The holder was like a little "cup" and I had to cut away an entire side of that cup to make room for the fascia itself. Initially I just sliced it off with a dremel cutting disc, but it was hard to get the cut edge perfect. Then I had an idea. Fishy has a mill. Like a serious huge milling machine with digital controls and everything. In fact, in one of the photos you can kinda see him in the background operating that very machine (he's building a steam engine right now and the mill is a big part of that). He used the mill to clean up that edge cut absolutely perfect. In the photos, you can see that the plastic edge below the fascia is perfectly straight and smooth- that's Fishy's milling work. Video and trunk installation details after I get the final PCB made for the BlueGigaEmpeg box and do a mounting bracket for the empeg sled. It'll be going in the "ceiling" area of the trunk, under the rear deck lid between the factor speaker locations. Thanks!
|
|
Top
|
|
|
|
|
#370001 - 09/12/2017 06:25
Re: Final custom 3D fascia models
[Re: tfabris]
|
carpal tunnel

Registered: 19/01/2002
Posts: 3584
Loc: Columbus, OH
|
That's pretty rad. Well done.
_________________________
~ John
|
|
Top
|
|
|
|
|
#370050 - 10/12/2017 21:23
Re: Final custom 3D fascia models
[Re: tfabris]
|
carpal tunnel
Registered: 10/06/1999
Posts: 5919
Loc: Wivenhoe, Essex, UK
|
That looks amazing.
_________________________
Remind me to change my signature to something more interesting someday
|
|
Top
|
|
|
|
|
#370051 - 10/12/2017 22:44
Re: Final custom 3D fascia models
[Re: andy]
|
carpal tunnel
Registered: 20/12/1999
Posts: 31636
Loc: Seattle, WA
|
|
|
Top
|
|
|
|
|
|


 Previous Topic
 Index
Index